Annotate Image
The  Annotate Image tool gives you a visual drawing layer directly on top of your image. Instead of describing changes in text alone, you can draw shapes, arrows, circles, and labels directly onto the photo to show the AI exactly what to change and where.
Annotate Image
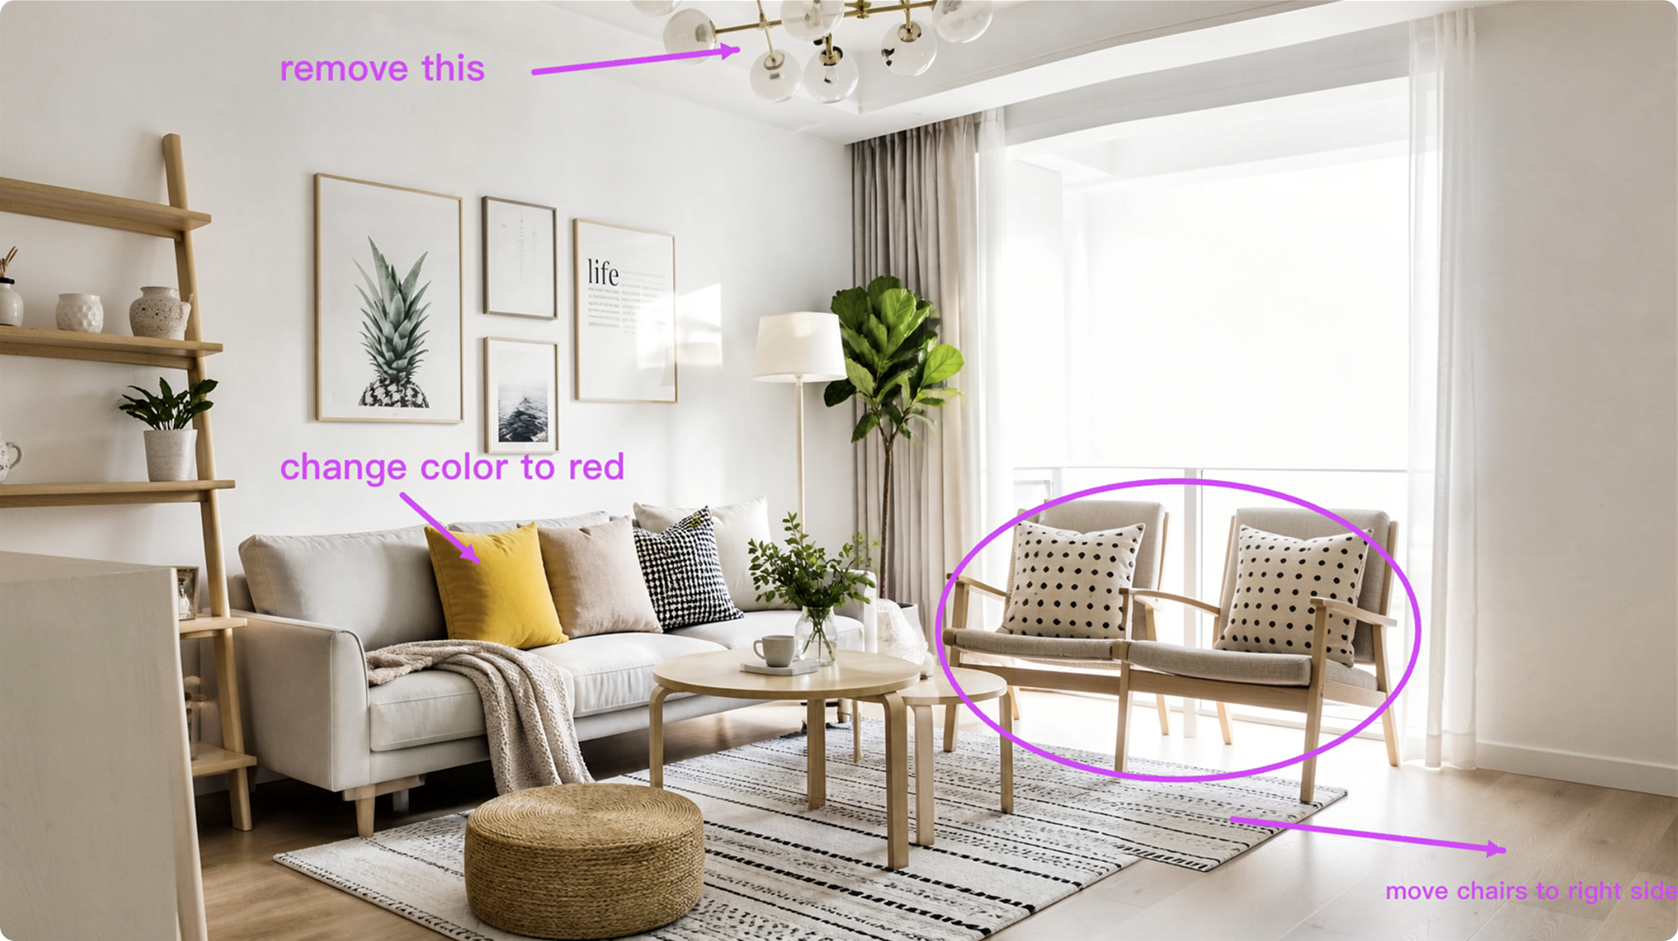
How It Works
Open the Annotate editor by clicking the icon from the floating toolbar. A full-screen drawing canvas appears on top of your image. Pick a tool—rectangle, ellipse, arrow, freehand, or text—and draw directly to show the AI exactly what to change and where. Combine shapes and text labels for maximum clarity, like circling a chair and writing "move to right side".
Two Generation Modes
Once you've finished drawing, click Generate. You'll choose between two modes depending on which model you're using:
Mode A — Generate
Best for: GPT-Image-2, Google Nano Banana, and other advanced multimodal models.
Your annotations are merged directly onto the image and sent to the model. These models are intelligent enough to read your drawings—the circles, arrows, and written text—as visual instructions and apply them precisely to generate the edited result.
- ✅ No intermediate step — the drawing is the instruction.
- ✅ Ideal for multimodal models that can interpret visual context natively.
- ✅ Precise spatial control: point, circle, or label anything.
Mode B — Analyze and Generate
Best for: Flux.2 [Klein], and other powerful diffusion models.
Your annotated image is first analyzed by the Studio Assistant, which reads your markups and translates them into a precise text edit prompt (e.g., "Change the circled chair to a green velvet stool"). That prompt is then automatically sent with your original, clean image to the model for generation. This unlocks the full creative power of diffusion models while letting you communicate visually.
- ✅ Harnesses the strength of diffusion models with visual input.
- ✅ The Studio Assistant faithfully interprets shapes, arrows, circles, and text labels.
- ✅ Your original image stays pristine; the annotation guides the AI without altering the source.
Use text labels on your annotation to guide both modes more precisely. Labels like "remove this", "change to wood", or "move to left" are read by the AI in Mode A and translated accurately by the Studio Assistant in Mode B.
Drawing Tools Reference
| Tool | Shortcut | Best For |
|---|---|---|
| Select | S | Moving or deleting existing shapes |
| Rectangle | R | Boxing an entire area or object |
| Ellipse | E | Circling a subject to highlight it |
| Arrow | A | Pointing to a specific detail |
| Freehand | F | Natural sketching and freeform marks |
| Text | T | Adding written instructions on the image |
Stroke colors: Magenta (default), Red, Yellow, Blue, White, Black
Stroke sizes: Small, Medium, Large
Keyboard shortcuts: ⌘Z to undo the last shape · Clear All to reset the canvas · Space + drag to pan the view.